Your How to build a privacy screen for deck images are available in this site. How to build a privacy screen for deck are a topic that is being searched for and liked by netizens today. You can Find and Download the How to build a privacy screen for deck files here. Download all free images.
If you’re looking for how to build a privacy screen for deck pictures information connected with to the how to build a privacy screen for deck keyword, you have come to the ideal blog. Our website always provides you with suggestions for seeing the highest quality video and image content, please kindly surf and locate more enlightening video articles and images that match your interests.
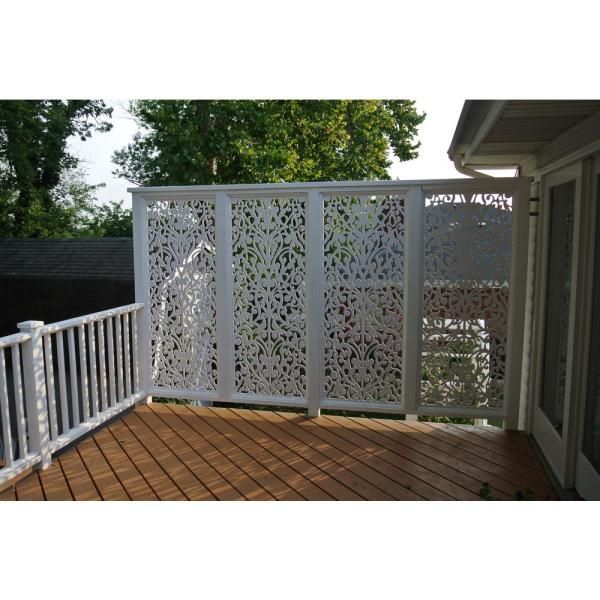
How To Build A Privacy Screen For Deck. The design of the panel is suitable for privacy screen function. Wind can be powerful. Then we started with a 6 width board and made sure to get it completely level as it was the guide for the rest of the privacy screen. Its a great option for a deck or patio of your house.
 Pin On Barn Makeover From pinterest.com
For a 11m screen you need 12 slats when using spacers. How to build a privacy deck railing. Plants are other things that you can pair with deck railing to create a privacy screen. Wind can be powerful. Instead of a plain panel this could be an interesting choice to add to your patio. The privacy screen was built with treated fence boards and metal posts I had mad.
Coat the bolt thoroughly with exterior sealant.
Wind can be powerful. As an example to create a fab you can pair the plants with planters to cover the deck rail. It separates the area from other areas nearby. Its a great way to recycle the material and also to add a splash of color to your porch. Notice the 2x2 material that is nailed to the inside of the supports. Nail the 1x4 slat boards to the outside of the 2x2 nailer board.
 Source: pinterest.com
It separates the area from other areas nearby. Empty wine and beer bottles can be repurposed in a clever way to create a privacy screen at the end of the porch like in this example. When you build a privacy screen its important to look at the building codes for your specific. For a 11m screen you need 12 slats when using spacers. So we added this framed wood lattice to the railing of our deck and secured it with support boards in the back.
 Source: pinterest.com
Nailing the slat boards. Take a look at the following picture. To build a deck railing start by figuring out how many posts you need then cut your wood to size and install the posts. Trex Fencing is easy to install as privacy railing or screens. The privacy screen was built with treated fence boards and metal posts I had mad.
 Source: co.pinterest.com
This will hold the slats. Plants are other things that you can pair with deck railing to create a privacy screen. The rails and pickets can be cut to fit between the posts and the pickets slide together to interlock. When complete install top end-cap. Here are a few more pictures with a little information on how the customer attached the lattice to the deck railing.
 Source: pinterest.com
Attach the horizontal slats. When complete install top end-cap. We are using 6x6 support posts with a 4x6 top cap. The design of the panel is suitable for privacy screen function. Take a look at the following picture.
 Source: pinterest.com
Although it wont offer complete privacy a patterned wood trellis serves as a decorative element for your backyard and creates a sense of coziness. If you want to totally screen out neighbours set slats 1 on top of the other otherwise use supplied spacers for gaps. Instead of a plain panel this could be an interesting choice to add to your patio. The privacy screen was built with treated fence boards and metal posts I had mad. Wind can be powerful.
 Source: pinterest.com
Advertisement 10 of 18 Save Pin FB. For a 11m screen you need 12 slats when using spacers. Take a look at the following picture. Adding Lattice to Deck Railing As you can see there are a few ways to add the lattice privacy screen on top of your deck railing. Its a great option for a deck or patio of your house.
 Source: pinterest.com
Run the posts for the screen from their own footing up to the pergola top. How to Build a Privacy Screen for your Deck. Coat the bolt thoroughly with exterior sealant. The design of the panel is suitable for privacy screen function. This will hold the slats.
 Source: pinterest.com
With a few boards to make a frame this decorative DIY outdoor privacy screen was really easy to make and looks great on my deck. Notice the 2x2 material that is nailed to the inside of the supports. Secure them to the rim joist with a 12-in. If you want to totally screen out neighbours set slats 1 on top of the other otherwise use supplied spacers for gaps. Nail the 1x4 slat boards to the outside of the 2x2 nailer board.
 Source: pinterest.com
You can build a frame around the lattice sheet at mount it on top of the deck rail. The good news is that there are so many species you can use in many different ways in this case. Coat the bolt thoroughly with exterior sealant. Cut screening slats to length and pre-coat with exterior decking oil as it is easiest at this stage. To build a deck railing start by figuring out how many posts you need then cut your wood to size and install the posts.
 Source: pinterest.com
How to Build a Privacy Screen for your Deck. Instead of a plain panel this could be an interesting choice to add to your patio. This will hold the slats. Here are a few more pictures with a little information on how the customer attached the lattice to the deck railing. Start by creating a frame to set the privacy screen.
 Source: pinterest.com
Empty wine and beer bottles can be repurposed in a clever way to create a privacy screen at the end of the porch like in this example. Trex Fencing is easy to install as privacy railing or screens. With a few boards to make a frame this decorative DIY outdoor privacy screen was really easy to make and looks great on my deck. 16Use Wine Bottles for a Splash of Color. We had a post on one side and a corner trim board on the house side so it was easy to screw the cedar lengths directly into each of these you will see we followed up with finishing boards at the end.
 Source: pinterest.com
We had a post on one side and a corner trim board on the house side so it was easy to screw the cedar lengths directly into each of these you will see we followed up with finishing boards at the end. Then we started with a 6 width board and made sure to get it completely level as it was the guide for the rest of the privacy screen. We had a post on one side and a corner trim board on the house side so it was easy to screw the cedar lengths directly into each of these you will see we followed up with finishing boards at the end. Install bottom end-cap and L bracket provided then install slats. A privacy screen is an easy way to create a little extra solitude or to hide unsightly things in your yard.
 Source: de.pinterest.com
This will hold the slats. 16Use Wine Bottles for a Splash of Color. So we added this framed wood lattice to the railing of our deck and secured it with support boards in the back. Nail the 1x4 slat boards to the outside of the 2x2 nailer board. You can paint the panels with different colors or just similar to the wood frame.
Source: pinterest.com
If you want to totally screen out neighbours set slats 1 on top of the other otherwise use supplied spacers for gaps. Privacy Screen Frame 1. Cut screening slats to length and pre-coat with exterior decking oil as it is easiest at this stage. Draw up your plan and buy the materials for a deck privacy screen. This video is about the DIY deck privacy screen I built on our current deck.
 Source: pinterest.com
Break up the line of sight by building a trellis on top of the deck railing. Coat the bolt thoroughly with exterior sealant. If you want to totally screen out neighbours set slats 1 on top of the other otherwise use supplied spacers for gaps. Start by creating a frame to set the privacy screen. When you build a privacy screen its important to look at the building codes for your specific.
 Source: pinterest.com
Wind can be powerful. Empty wine and beer bottles can be repurposed in a clever way to create a privacy screen at the end of the porch like in this example. Then we started with a 6 width board and made sure to get it completely level as it was the guide for the rest of the privacy screen. Advertisement 10 of 18 Save Pin FB. Instead of a plain panel this could be an interesting choice to add to your patio.
 Source: pinterest.com
If you want to totally screen out neighbours set slats 1 on top of the other otherwise use supplied spacers for gaps. How to Build a Privacy Screen for your Deck. Trex Fencing is easy to install as privacy railing or screens. The privacy screen was built with treated fence boards and metal posts I had mad. When you build a privacy screen its important to look at the building codes for your specific.
 Source: pinterest.com
Privacy Screen Frame 1. When you build a privacy screen its important to look at the building codes for your specific. So we added this framed wood lattice to the railing of our deck and secured it with support boards in the back. For a 11m screen you need 12 slats when using spacers. Privacy Screen Frame 1.
This site is an open community for users to do sharing their favorite wallpapers on the internet, all images or pictures in this website are for personal wallpaper use only, it is stricly prohibited to use this wallpaper for commercial purposes, if you are the author and find this image is shared without your permission, please kindly raise a DMCA report to Us.
If you find this site beneficial, please support us by sharing this posts to your favorite social media accounts like Facebook, Instagram and so on or you can also bookmark this blog page with the title how to build a privacy screen for deck by using Ctrl + D for devices a laptop with a Windows operating system or Command + D for laptops with an Apple operating system. If you use a smartphone, you can also use the drawer menu of the browser you are using. Whether it’s a Windows, Mac, iOS or Android operating system, you will still be able to bookmark this website.